Getting Started
Concession Trailer Design
Building Your Dream
Design Process
Each Century Food Concession trailer is custom designed and built to achieve individual requirements for a unique appearance and sales volume geared to your products and your company's identity. The design process involves breaking the project into smaller elements that when combined produce the desired result.
Menu
Outline the menu items that you plan to offer. Include food items and drinks.
Body Configuration
Choose whether a center layout or lineup layout is the best production and sales configuration for your operation.
Select either a fixed height rubber-ride suspension or a retractable air-ride suspension.
Determine the optimum end to locate the towing hitch and the location of the entrance door.
Cooking & Prep Equipment
List the equipment that you will need to store, prepare, and display the food items that you plan to offer. Along with equipment sizes and capacities, list any manufacturer and model preferences that you have.
Support Equipment
List additional equipment items that you will need. Include items such as cash drawers and registers, air conditioners, wash sinks, sprayers, water filters, ice makers, and other items that support your operation.
Utilities
How do you plan to power the equipment? For trailers with cooking equipment, will you need a combination of electric and LP gas, or will the trailer be all electric?
What size wash sinks do you need? Open or recessed with a lift-up work top? Fresh and/or waste water holding tanks?
Exterior
Marquees & Graphics
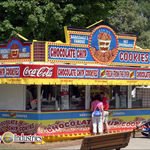
How you design the outside of the your trailer determines how well your customers will understand what you sell, and projects a unique identity that customers will remember so that know where to return and send their friends.
For sales window awnings you can choose from double-fold awnings with backlighting, straight awnings, or cafe style awnings.
Roof mounted sign marquees are available in fixed and folding, signs with front lighting or backlighting, chaser lights, LED accent strips, flags, banners, and more.
Below is a sampling of awning and marquee styles
Click on Image to expand
Design Summary
From your menu, the primary equipment list is determined. The equipment package then dictates the body size required to accommodate it all. Next you establish what utilities will be required to make it all work, and add in the support equipment and features desired. This allows the development of a preliminary configuration concept for equipment positioning and product flow.
Assemble an outline which includes the following:
-
Menu
-
Holding, preparation, and display equipment
-
Required utilities
-
Body configuration
-
Support equipment, systems, & features
-
Marquee and sign style
-
Color and graphic preferences
A rough sketch and outline will go a long way in determining the viability of the approach, plus an initial idea of how you expect it to look.
Armed with this information, one can move ahead, filling in the details, evaluating the options, and addressing any special requirements.


